Control RGBW LED Strip with PWM
Published on: February 25, 2020
Welcome to the 14th Raspberry Pi Tutorial! The last tutorial format went well so I decided to go the same route. The video is a quick demo and a quick walkthrough of the set up. Most of the information you'll need to set this up can be found on this page and on GitHub.
You can find the code and more detailed technical information in the following GitHub repo: https://github.com/naztronaut/RaspberryPi-RGBW-Control
Here's a quick demo of what the end product looks like:
Let's talk hardware:
You'll need the following pieces of hardware for this project (get more info in the Github repo):
- Raspberry Pi - any will work for this project
- MOSFET Transistors - Must be logic level which will allow you to trigger it with 5V connection. I've testd with IRLU024 and IRL2203.
- RGBW LED Strip
- Wiring
- Power Supply for Pi and Lights - for lights I use a 12v LED strip but this should also work with 24v.
Let's talk Software:
This tutorial assumes you know a few things. I've already covered most of these in previous tutorials so feel free to look through them if you are unsure. I would highly recommend going through the repository steps and without repeating my old tutorials, please make sure you have the following done on your pi:
- Headless Raspberry Pi
- http://abyz.me.uk/rpi/pigpio/pigpiod.html
- Run Apache on your Pi
- Running a Flask App on your Pi
- Run Flask behind Apache
- Simple AJAX with jQuery/JavaScript
The last one is optional since the repository gi
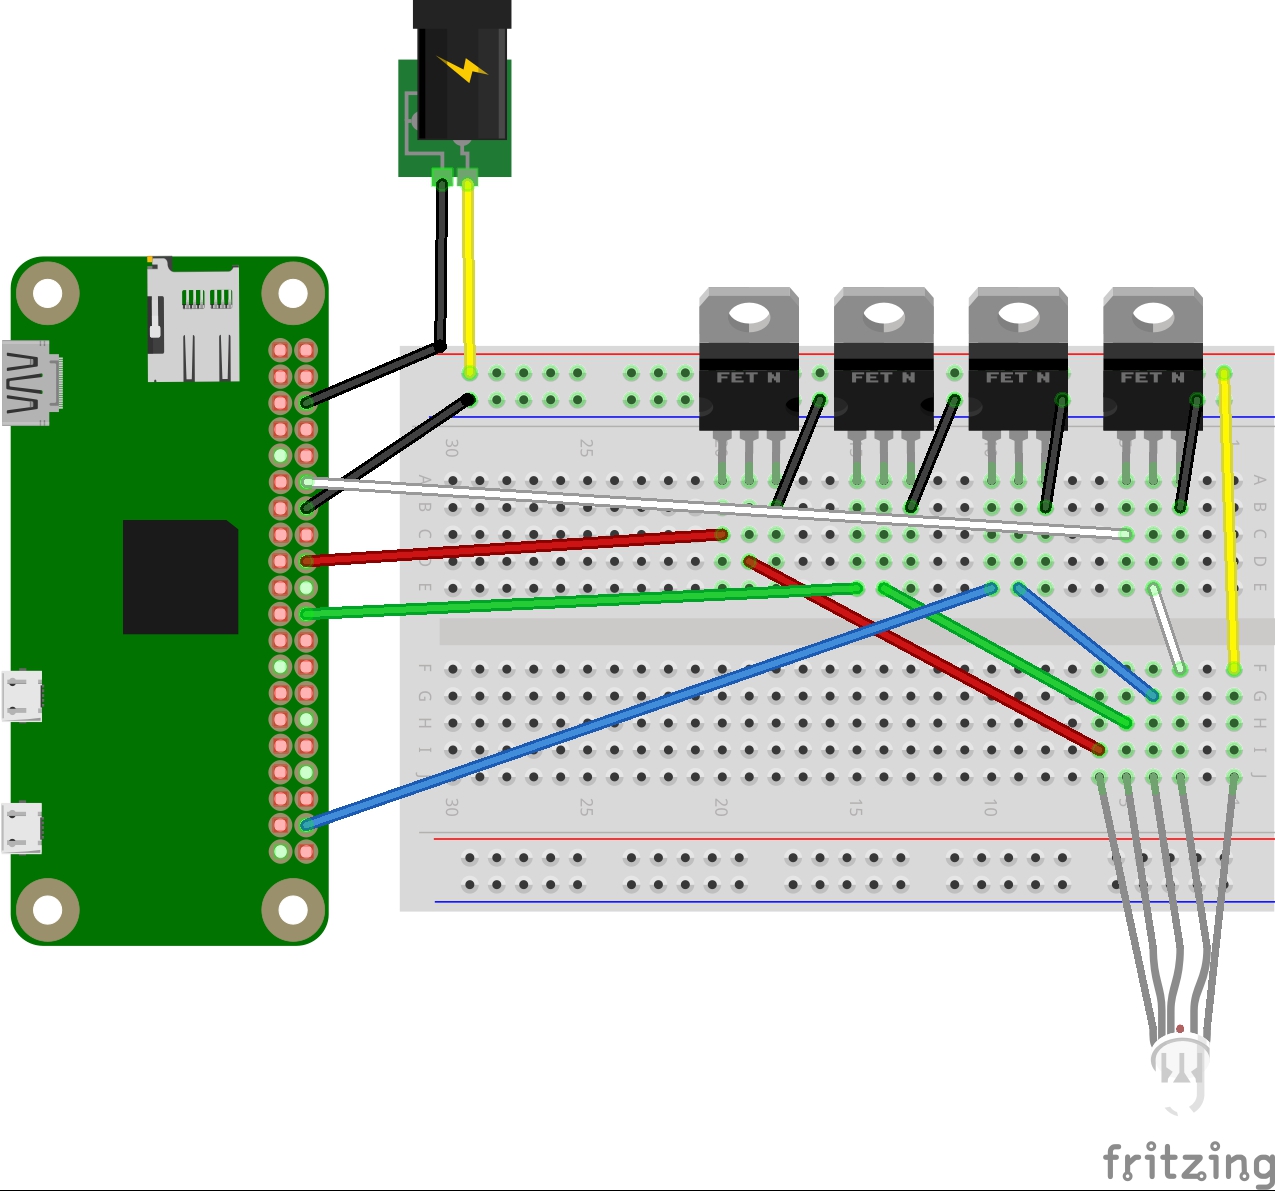
Now let's connect everything as shown in this fritz schematic:

| Color | GPIO Pin |
|---|---|
| Red | 24 |
| Green | 25 |
| Blue | 20 |
| White | 18 |
| Yellow | Power |
| Black | GND |
The yellow wire is used to demonstrate power since the red wire is naturally connected to the Red LED. I'm using an N-Channel MOSFET so they are all common ground. If you have a P-Channel FET, make sure you switch those. And if you switch any of the colored pins, make sure you update rgbw.py to reflect those changes!
This is all controlled by a Flask APP triggering PIGPIO. So be sure to go through tutorials 4 and 5 above to understand how those work. Check out the Software section of the Github repo to learn how to install PIGPIOD globally on your Pi. To isntall it locally into your virtual environment, run this command:
pip install pigpio
Every dependency is localized so once you get through the installation, your setup will continue to work on your local network without an external connection. If you're interested in knowing which API endpoints are created after you set up Apache, check out the API Endpoints section of the Github Repo.
Have questions about the tutorial? Ask below or open an issue on the GitHub repository, I welcome all questions and comments.
Remember to checkout the Resources section below for associated downloadable content, JSFiddle links, and other resources. Watch the video and follow along!
Resources:
Check out the entire project on GitHub: https://github.com/naztronaut/RaspberryPi-RGBW-Control
